Simple Text Classification using LSTM for Beginners
Introduction:
It contains the following parts:
- Setup your environment
- Build your Text Classification model
- Model Validation
To run the program on your local computer, install the following required libraries, These libraries are
- python 3.8.0
- numpy
- pandas
- matplotlib
- scikit-learn
- tensorflow 2.0
- keras 2.3.0
Build your Text Classification model
Step 1: Understand the data
The first step of model prediction is to understand the data. It is more important to all machine learning and deep learning projects. You can find more information about the data, go to IMDB Movie Review Sentiment Classification Data.
Step 2: Import the Packages
Create a python file (for example model.py). After installed the required packages, import packages in your python file.
import pandas as pd
import numpy as np
import matplotlib.pyplot as plt

from keras.datasets import imdb
from keras.models import Sequential
from keras.layers import Dense
from keras.layers import LSTM
from keras.layers.embeddings import Embedding
from keras.preprocessing import sequence
np.random.seed(7)
Step 3: Import and Split the dataNext, import the data using pandas and split the data into training and testing. The model trained by training dataset and then apply the evaluation of model used by test dataset.
top_words = 5000
(X_train, y_train), (X_test, y_test) =
	imdb.load_data(num_words=top_words)
print('Shape of training data: ')
print(X_train.shape)
print(y_train.shape)
print('Shape of test data: ')
print(X_test.shape)
print(y_test.shape)Out[]:
Shape of training data:
(25000,)
(25000,)
Shape of test data:
(25000,)
(25000,)
max_review_length = 500
X_train = sequence.pad_sequences(X_train,
	maxlen=max_review_length)
X_test = sequence.pad_sequences(X_test,
	maxlen=max_review_length)
We create model for simple text classification using LSTM. It is type of deep learning networks. It is variation of reccurent neural network. In this neural network, has feedback connections.
epochs = 10

embedding_vecor_length = 16
model = Sequential()
model.add(Embedding(top_words,
	embedding_vecor_length,
    	input_length=max_review_length))
model.add(LSTM(16))
model.add(Dense(1, activation='sigmoid'))
- Embedding- used for text data, requires that input data be encoded.
- LSTM- lstm layer, information thorugh as it propagates forward.
- Dense - fully connected neural network layer and it implement the operations.
- Activation - used through an activation layer, or through the activation argument supported by all forward layers.
model.summary()
Out[]:
Model: "sequential"

Layer (type)               Output Shape       Param #
===========================================
embedding (Embedding)      (None, 500, 16)    80000
___________________________________________
lstm (LSTM)                (None, 16)         2112
___________________________________________
dense (Dense)              (None, 1)          17
===========================================
Total params: 82,129
Trainable params: 82,129
Non-trainable params: 0
___________________________________________
model.compile(optimizer='rmsprop',
	loss='binary_crossentropy',
    	metrics=['accuracy'])
history = model.fit(X_train,
	y_train,
    	validation_data=(X_test, y_test),
        epochs=epochs,
            	batch_size=64)
Out[]:
Epoch 1/10
391/391 [=========] - 89s 222ms/step -
loss: 0.5819 - accuracy: 0.6733
- val_loss: 0.3507 - val_accuracy: 0.8565
Epoch 2/10
391/391 [=========] - 85s 217ms/step -
loss: 0.2959 - accuracy: 0.8832
- val_loss: 0.3219 - val_accuracy: 0.8748
Epoch 3/10
391/391 [=========] - 86s 221ms/step -
loss: 0.2520 - accuracy: 0.9049
- val_loss: 0.2859 - val_accuracy: 0.8808
Epoch 4/10
391/391 [=========] - 87s 223ms/step -
loss: 0.2263 - accuracy: 0.9155
- val_loss: 0.2997 - val_accuracy: 0.8828
Epoch 5/10
391/391 [=========] - 87s 223ms/step -
loss: 0.2101 - accuracy: 0.9233
- val_loss: 0.3244 - val_accuracy: 0.8742
Epoch 6/10
391/391 [=========] - 84s 216ms/step -
loss: 0.2057 - accuracy: 0.9239
- val_loss: 0.3207 - val_accuracy: 0.8778
Epoch 7/10
391/391 [=========] - 85s 217ms/step -
loss: 0.1951 - accuracy: 0.9268
- val_loss: 0.3366 - val_accuracy: 0.8714
Epoch 8/10
391/391 [==========] - 85s 218ms/step -
loss: 0.1919 - accuracy: 0.9296
- val_loss: 0.3122 - val_accuracy: 0.8807
Epoch 9/10
391/391 [==========] - 85s 217ms/step -
loss: 0.1809 - accuracy: 0.9345
- val_loss: 0.4599 - val_accuracy: 0.8459
Epoch 10/10
391/391 [==========] - 84s 215ms/step -
loss: 0.1708 - accuracy: 0.9374
- val_loss: 0.3143 - val_accuracy: 0.8803
Model Validation
Finally, We created the model and then validate it.
test =  model.evaluate(X_test, y_test, verbose=0)
print("Testing Accuracy: %.2f%%" % (test[1]*100))
Out[]:
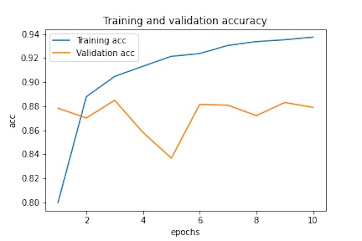
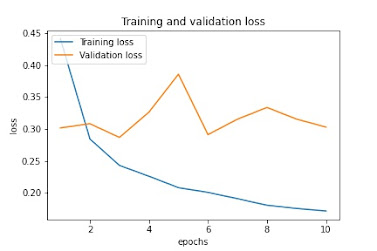
Testing Accuracy: 88.03%def plot_result(history, epoch):
epoch_range = range(1, epoch+1)
plt.plot(epoch_range,
history.history['accuracy'],
label='Training acc')
plt.plot(epoch_range,
history.history['val_accuracy'],
label='Validation acc')
plt.title('Training and validation accuracy')
plt.xlabel('epochs')
plt.ylabel('acc')
plt.legend()
plt.show()
plt.plot(epoch_range,
history.history['loss'],
label='Training loss')
plt.plot(epoch_range,
history.history['val_loss'],
label='Validation loss')
plt.title('Training and validation loss')
plt.xlabel('epochs')
plt.ylabel('loss')
plt.legend()
plt.show()plot_result(history, epochs)Training and validation accuracy

Training and validation loss

No comments:
Post a Comment